BSD Now 190. epizód – The Moore You Know

Közzétéve Szerző HUP

A BSD Now egy heti rendszerességgel megjelenő video podcast, amelynek célja a BSD operációs rendszerek népszerűsítése, illetve a már meglevő felhasználók friss BSD-s információkkal, hírekkel való ellátása. A BSD Now egyik műsorvezetője a PC-BSD alapító, vezető fejlesztő Kris Moore. Elérhető a BSD Now 190. epizódja, címe “BSD Now 190. epizód – The Moore You Know“.

Bővebben BSD Now 190. epizód – The Moore You Know

BSD Now 188. epizód – And then the murders began

Közzétéve Szerző HUP

A BSD Now egy heti rendszerességgel megjelenő video podcast, amelynek célja a BSD operációs rendszerek népszerűsítése, illetve a már meglevő felhasználók friss BSD-s információkkal, hírekkel való ellátása. A BSD Now egyik műsorvezetője a PC-BSD alapító, vezető fejlesztő Kris Moore. Elérhető a BSD Now 188. epizódja, címe “BSD Now 188. epizód – And then the murders began“.

Bővebben BSD Now 188. epizód – And then the murders began

BSD Now 187. epizód – Catching up to BSD

Közzétéve Szerző HUP

A BSD Now egy heti rendszerességgel megjelenő video podcast, amelynek célja a BSD operációs rendszerek népszerűsítése, illetve a már meglevő felhasználók friss BSD-s információkkal, hírekkel való ellátása. A BSD Now egyik műsorvezetője a PC-BSD alapító, vezető fejlesztő Kris Moore. Elérhető a BSD Now 187. epizódja, címe “BSD Now 187. epizód: Catching up to BSD“.

Bővebben BSD Now 187. epizód – Catching up to BSD

OPNsense teszt

Közzétéve Szerző HUP

OPNsense teszt

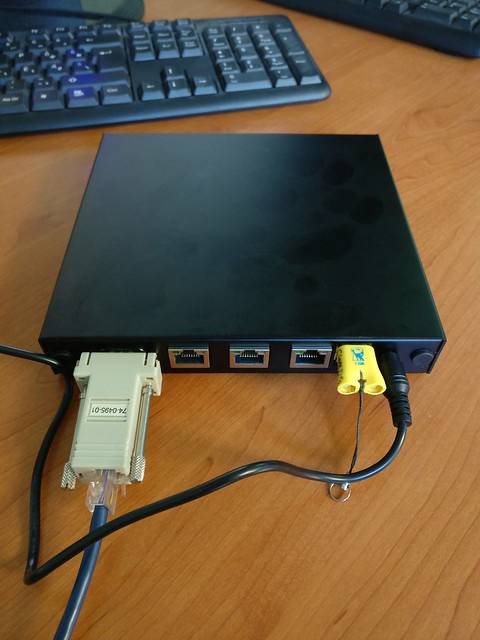
Az OPNsense egy pfSense fork. Fejlesztői számos dolgot máshogy akarnak csinálni, mint a szülőprojekt. A pfSense-t jól ismerem, hosszú évek óta használom. Viszont kíváncsi voltam az OPNsense-re is, ezért úgy döntöttem, hogy teszek vele egy próbát. A hardver adott volt: a korábban már ismertetett APU.2C2 alaplap. A változás mindössze annyi, hogy az SD kártya helyett az adattárolásért ezúttal egy 16 GB-os mSATA SSD felelt.

Mivel a célhardveren nincs VGA kimenet, a telepítést soros porton keresztül végeztem el. Szerencsére a pfSense-hez hasonlóan az OPNsense is támogatja ezt a telepítési metódust. A megfelelő telepítő image letölthető innen:

root@alderaan:/tmp# wget -c http://mirror.ams1.nl.leaseweb.net/opnsense/releases/mirror/OPNsense-17.1-OpenSSL-serial-amd64.img.bz2

Kibontjuk, majd egy USB-s pendrive-ra írjuk:

root@alderaan:/tmp# dd if=OPNsense-17.1-OpenSSL-serial-amd64.img of=/dev/sdb bs=16k

Ha ez megvan, dugjuk fel az elkészített pendrive-ot az eszközre, majd lőjük be a soros porti kommunikációt a gépünk és az eszköz közt. Ha sikerült, akkor bootolhatunk. A megfelelő terminál kliensünkkel a következőket láthatjuk:

SeaBIOS (version ?-20160307_153453-michael-desktop64)
XHCI init on dev 00:10.0: regs @ 0xfeb22000, 4 ports, 32 slots, 32 byte contexts
XHCI    extcap 0x1 @ feb22500
XHCI    protocol USB  3.00, 2 ports (offset 1), def 0
XHCI    protocol USB  2.00, 2 ports (offset 3), def 10
XHCI    extcap 0xa @ feb22540
Found 2 serial ports
ATA controller 1 at 4010/4020/0 (irq 0 dev 88)
EHCI init on dev 00:13.0 (regs=0xfeb25420)
ATA controller 2 at 4018/4024/0 (irq 0 dev 88)
Searching bootorder for: /pci@i0cf8/*@14,7
Searching bootorder for: /rom@img/memtest
Searching bootorder for: /rom@img/setup
ata0-0: KingFast ATA-9 Hard-Disk (15272 MiBytes)
Searching bootorder for: /pci@i0cf8/*@11/drive@0/disk@0
XHCI port #4: 0x00200e03, powered, enabled, pls 0, speed 3 [High]
Searching bootorder for: /pci@i0cf8/usb@10/storage@4/*@0/*@0,0
Searching bootorder for: /pci@i0cf8/usb@10/usb-*@4
USB MSC vendor='Kingston' product='DataTravelerMini' rev='PMAP' type=0 removable=1
USB MSC blksize=512 sectors=1955328
Initialized USB HUB (0 ports used)
All threads complete.
Scan for option roms
PCengines Press F10 key now for boot menu:
Select boot device:

1. USB MSC Drive Kingston DataTravelerMini PMAP
2. ata0-0: KingFast ATA-9 Hard-Disk (15272 MiBytes)
3. Payload [memtest]
4. Payload [setup]

Az “1.” menüpontot választva elindul az OPNsense telepítője a pendrive-ról:

------------------------------------------------------------------------------
 
                  ______  _____  _____                         
                 /  __  |/ ___ |/ __  |                        
                 | |  | | |__/ | |  | |___  ___ _ __  ___  ___ 
                 | |  | |  ___/| |  | / __|/ _ \ '_ \/ __|/ _ \
                 | |__| | |    | |  | \__ \  __/ | | \__ \  __/
                 |_____/|_|    |_| /__|___/\___|_| |_|___/\___|

 +=========================================+     @@@@@@@@@@@@@@@@@@@@@@@@@@@@
 |                                         |   @@@@@@@@@@@@@@@@@@@@@@@@@@@@@@
 |  1. Boot Multi User [Enter]             |   @@@@@                    @@@@@
 |  2. Boot [S]ingle User                  |       @@@@@            @@@@@    
 |  3. [Esc]ape to loader prompt           |    @@@@@@@@@@@       @@@@@@@@@@@
 |  4. Reboot                              |         \\\\\         /////     
 |                                         |   ))))))))))))       (((((((((((
 |  Options:                               |         /////         \\\\\     
 |  5. [K]ernel: kernel (1 of 2)           |    @@@@@@@@@@@       @@@@@@@@@@@
 |  6. Configure Boot [O]ptions...         |       @@@@@            @@@@@    
 |                                         |   @@@@@                    @@@@@
 |                                         |   @@@@@@@@@@@@@@@@@@@@@@@@@@@@@@
 |                                         |   @@@@@@@@@@@@@@@@@@@@@@@@@@@@  
 +=========================================+                                  
                                                  17.1  ``Eclectic Eagle''    

/boot/kernel/kernel text=0x15ffc88 data=0x13f330+0x4c5ee8 syms=[0x8+0x170d78+0x8+0x188f6d]
/boot/entropy size=0x1000
/boot/kernel/if_gre.ko size 0x6058 at 0x2300000
/boot/kernel/if_tap.ko size 0x75a8 at 0x2307000
/boot/kernel/pf.ko size 0x502b0 at 0x230f000
/boot/kernel/carp.ko size 0xe778 at 0x2360000
/boot/kernel/if_bridge.ko size 0xe1e0 at 0x236f000
loading required module 'bridgestp'
/boot/kernel/bridgestp.ko size 0x6e40 at 0x237e000
/boot/kernel/if_lagg.ko size 0x11078 at 0x2385000
/boot/kernel/ng_UI.ko size 0x1638 at 0x2397000
loading required module 'netgraph'
/boot/kernel/netgraph.ko size 0x160f8 at 0x2399000
/boot/kernel/ng_async.ko size 0x3718 at 0x23b0000
/boot/kernel/ng_bpf.ko size 0x46b0 at 0x23b4000
/boot/kernel/ng_bridge.ko size 0x4f30 at 0x23b9000
/boot/kernel/ng_cisco.ko size 0x2ea0 at 0x23be000
/boot/kernel/ng_echo.ko size 0xf20 at 0x23c1000
/boot/kernel/ng_eiface.ko size 0x33b0 at 0x23c2000
/boot/kernel/ng_ether.ko size 0x46f8 at 0x23c6000
/boot/kernel/ng_frame_relay.ko size 0x1d90 at 0x23cb000
/boot/kernel/ng_hole.ko size 0x17e8 at 0x23cd000
/boot/kernel/ng_iface.ko size 0x3988 at 0x23cf000
/boot/kernel/ng_ksocket.ko size 0x6168 at 0x23d3000
/boot/kernel/ng_l2tp.ko size 0x6648 at 0x23da000
/boot/kernel/ng_lmi.ko size 0x4000 at 0x23e1000
/boot/kernel/ng_mppc.ko size 0x5ca8 at 0x23e5000
loading required module 'rc4'
/boot/kernel/rc4.ko size 0xb38 at 0x23eb000
/boot/kernel/ng_one2many.ko size 0x2ac8 at 0x23ec000
/boot/kernel/ng_ppp.ko size 0x95c0 at 0x23ef000
/boot/kernel/ng_pppoe.ko size 0x7548 at 0x23f9000
/boot/kernel/ng_pptpgre.ko size 0x47a0 at 0x2401000
/boot/kernel/ng_rfc1490.ko size 0x25a0 at 0x2406000
/boot/kernel/ng_socket.ko size 0x60e8 at 0x2409000
/boot/kernel/ng_tee.ko size 0x21a0 at 0x2410000
/boot/kernel/ng_tty.ko size 0x2e98 at 0x2413000
/boot/kernel/ng_vjc.ko size 0x4498 at 0x2416000
/boot/kernel/ng_vlan.ko size 0x2fc0 at 0x241b000
/boot/kernel/if_enc.ko size 0x30a8 at 0x241e000
/boot/kernel/pflog.ko size 0x28d0 at 0x2422000
/boot/kernel/pfsync.ko size 0xcfe0 at 0x2425000
/boot/kernel/ng_car.ko size 0x33b0 at 0x2432000
/boot/kernel/ng_deflate.ko size 0x3718 at 0x2436000
/boot/kernel/ng_pipe.ko size 0x4f18 at 0x243a000
/boot/kernel/ng_pred1.ko size 0x3400 at 0x243f000
/boot/kernel/ng_tcpmss.ko size 0x2048 at 0x2443000
Booting...
KDB: debugger backends: ddb
KDB: current backend: ddb
Copyright (c) 1992-2016 The FreeBSD Project.
Copyright (c) 1979, 1980, 1983, 1986, 1988, 1989, 1991, 1992, 1993, 1994
        The Regents of the University of California. All rights reserved.
FreeBSD is a registered trademark of The FreeBSD Foundation.
FreeBSD 11.0-RELEASE-p7 #0 2b43b65ed(stable/17.1): Tue Jan 24 00:45:53 CET 2017
    root@sensey64:/usr/obj/usr/src/sys/SMP amd64
FreeBSD clang version 3.8.0 (tags/RELEASE_380/final 262564) (based on LLVM 3.8.0)
[HBSD LOG] logging to system: enabled
[HBSD LOG] logging to user: disabled
[HBSD ASLR] status: opt-out
[HBSD ASLR] mmap: 30 bit
[HBSD ASLR] exec base: 30 bit
[HBSD ASLR] stack: 42 bit
[HBSD ASLR] vdso: 28 bit
[HBSD ASLR] map32bit: 18 bit
[HBSD ASLR] disallow MAP_32BIT mode mmap: opt-in
[HBSD ASLR (compat)] status: opt-out
[HBSD ASLR (compat)] mmap: 14 bit
[HBSD ASLR (compat)] exec base: 14 bit
[HBSD ASLR (compat)] stack: 14 bit
[HBSD ASLR (compat)] vdso: 8 bit
[HBSD SEGVGUARD] status: opt-out
[HBSD SEGVGUARD] expiry: 120 sec
[HBSD SEGVGUARD] suspension: 600 sec
[HBSD SEGVGUARD] maxcrashes: 5
CPU: AMD GX-412TC SOC                                (998.17-MHz K8-class CPU)
  Origin="AuthenticAMD"  Id=0x730f01  Family=0x16  Model=0x30  Stepping=1
  Features=0x178bfbff<FPU,VME,DE,PSE,TSC,MSR,PAE,MCE,CX8,APIC,SEP,MTRR,PGE,MCA,CMOV,PAT,PSE36,CLFLUSH,MMX,FXSR,SSE,SSE2,HTT>
  Features2=0x3ed8220b<SSE3,PCLMULQDQ,MON,SSSE3,CX16,SSE4.1,SSE4.2,MOVBE,POPCNT,AESNI,XSAVE,OSXSAVE,AVX,F16C>
  AMD Features=0x2e500800<SYSCALL,NX,MMX+,FFXSR,Page1GB,RDTSCP,LM>
  AMD Features2=0x1d4037ff<LAHF,CMP,SVM,ExtAPIC,CR8,ABM,SSE4A,MAS,Prefetch,OSVW,IBS,SKINIT,WDT,Topology,PNXC,DBE,PTSC,PL2I>
  Structured Extended Features=0x8<BMI1>
  XSAVE Features=0x1<XSAVEOPT>
  SVM: NP,NRIP,AFlush,DAssist,NAsids=8
  TSC: P-state invariant, performance statistics
real memory  = 2012925952 (1919 MB)
avail memory = 1903120384 (1814 MB)
Event timer "LAPIC" quality 400
ACPI APIC Table: <CORE   COREBOOT>
FreeBSD/SMP: Multiprocessor System Detected: 4 CPUs
FreeBSD/SMP: 1 package(s) x 4 core(s)
random: unblocking device.
ioapic1: Changing APIC ID to 5
ioapic0 <Version 2.1> irqs 0-23 on motherboard
ioapic1 <Version 2.1> irqs 24-55 on motherboard
random: entropy device external interface
wlan: mac acl policy registered
netmap: loaded module
module_register_init: MOD_LOAD (vesa, 0xffffffff810faf40, 0) error 19
kbd0 at kbdmux0
cryptosoft0: <software crypto> on motherboard
acpi0: <CORE COREBOOT> on motherboard
acpi0: Power Button (fixed)
cpu0: <ACPI CPU> on acpi0
cpu1: <ACPI CPU> on acpi0
cpu2: <ACPI CPU> on acpi0
cpu3: <ACPI CPU> on acpi0
atrtc0: <AT realtime clock> port 0x70-0x71 irq 8 on acpi0
Event timer "RTC" frequency 32768 Hz quality 0
attimer0: <AT timer> port 0x40-0x43 irq 0 on acpi0
Timecounter "i8254" frequency 1193182 Hz quality 0
Event timer "i8254" frequency 1193182 Hz quality 100
Timecounter "ACPI-safe" frequency 3579545 Hz quality 850
acpi_timer0: <32-bit timer at 3.579545MHz> port 0x818-0x81b on acpi0
hpet0: <High Precision Event Timer> iomem 0xfed00000-0xfed003ff on acpi0
Timecounter "HPET" frequency 14318180 Hz quality 950
acpi_button0: <Power Button> on acpi0
pcib0: <ACPI Host-PCI bridge> port 0xcf8-0xcff on acpi0
pci0: <ACPI PCI bus> on pcib0
pcib1: <ACPI PCI-PCI bridge> at device 2.2 on pci0
pcib1: failed to allocate initial I/O port window: 0x1000-0x1fff
pci1: <ACPI PCI bus> on pcib1
igb0: <Intel(R) PRO/1000 Network Connection, Version - 2.5.3-k> mem 0xfe600000-0xfe61ffff,0xfe620000-0xfe623fff at device 0.0 on pci1
igb0: Using MSIX interrupts with 3 vectors
igb0: Ethernet address: 00:0d:b9:45:38:6c
igb0: Bound queue 0 to cpu 0
igb0: Bound queue 1 to cpu 1
igb0: netmap queues/slots: TX 2/1024, RX 2/1024
pcib2: <ACPI PCI-PCI bridge> at device 2.3 on pci0
pci2: <ACPI PCI bus> on pcib2
igb1: <Intel(R) PRO/1000 Network Connection, Version - 2.5.3-k> port 0x2000-0x201f mem 0xfe700000-0xfe71ffff,0xfe720000-0xfe723fff at device 0.0 on pci2
igb1: Using MSIX interrupts with 3 vectors
igb1: Ethernet address: 00:0d:b9:45:38:6d
igb1: Bound queue 0 to cpu 2
igb1: Bound queue 1 to cpu 3
igb1: netmap queues/slots: TX 2/1024, RX 2/1024
pcib3: <ACPI PCI-PCI bridge> at device 2.4 on pci0
pci3: <ACPI PCI bus> on pcib3
igb2: <Intel(R) PRO/1000 Network Connection, Version - 2.5.3-k> port 0x3000-0x301f mem 0xfe800000-0xfe81ffff,0xfe820000-0xfe823fff at device 0.0 on pci3
igb2: Using MSIX interrupts with 3 vectors
igb2: Ethernet address: 00:0d:b9:45:38:6e
igb2: Bound queue 0 to cpu 0
igb2: Bound queue 1 to cpu 1
igb2: netmap queues/slots: TX 2/1024, RX 2/1024
pci0: <encrypt/decrypt> at device 8.0 (no driver attached)
xhci0: <AMD FCH USB 3.0 controller> mem 0xfeb22000-0xfeb23fff at device 16.0 on pci0
xhci0: 32 bytes context size, 64-bit DMA
xhci0: Unable to map MSI-X table 
usbus0 on xhci0
ahci0: <AMD Hudson-2 AHCI SATA controller> port 0x4010-0x4017,0x4020-0x4023,0x4018-0x401f,0x4024-0x4027,0x4000-0x400f mem 0xfeb25000-0xfeb253ff at device 17.0 on pci0
ahci0: AHCI v1.30 with 2 6Gbps ports, Port Multiplier supported with FBS
ahcich0: <AHCI channel> at channel 0 on ahci0
ahcich1: <AHCI channel> at channel 1 on ahci0
ehci0: <AMD FCH USB 2.0 controller> mem 0xfeb25400-0xfeb254ff at device 19.0 on pci0
usbus1: EHCI version 1.0
usbus1 on ehci0
isab0: <PCI-ISA bridge> at device 20.3 on pci0
isa0: <ISA bus> on isab0
sdhci_pci0: <Generic SD HCI> mem 0xfeb25500-0xfeb255ff at device 20.7 on pci0
sdhci_pci0: 1 slot(s) allocated
uart0: <16550 or compatible> port 0x3f8-0x3ff irq 4 flags 0x10 on acpi0
uart0: console (115200,n,8,1)
orm0: <ISA Option ROMs> at iomem 0xc0000-0xc0fff,0xef000-0xeffff on isa0
ppc0: cannot reserve I/O port range
uart1: <16550 or compatible> at port 0x2f8 irq 3 on isa0
hwpstate0: <Cool`n'Quiet 2.0> on cpu0
Timecounters tick every 1.000 msec
nvme cam probe device init
usbus0: 5.0Gbps Super Speed USB v3.0
usbus1: 480Mbps High Speed USB v2.0
ugen0.1: <0x1022> at usbus0
uhub0: <0x1022 XHCI root HUB, class 9/0, rev 3.00/1.00, addr 1> on usbus0
ugen1.1: <AMD> at usbus1
uhub1: <AMD EHCI root HUB, class 9/0, rev 2.00/1.00, addr 1> on usbus1
uhub0: 4 ports with 4 removable, self powered
uhub1: 2 ports with 2 removable, self powered
ugen1.2: <vendor 0x0438> at usbus1
uhub2: <vendor 0x0438 product 0x7900, class 9/0, rev 2.00/0.18, addr 2> on usbus1
ugen0.2: <Kingston> at usbus0
umass0: <Kingston DataTravelerMini, class 0/0, rev 2.00/1.00, addr 1> on usbus0
umass0:  SCSI over Bulk-Only; quirks = 0xc100
umass0:2:0: Attached to scbus2
uhub2: 4 ports with 4 removable, self powered
(probe0:umass-sim0:0:0:0): INQUIRY. CDB: 12 00 00 00 24 00 
(probe0:umass-sim0:0:0:0): CAM status: CCB request completed with an error
(probe0:umass-sim0:0:0:0): Retrying command
(probe0:umass-sim0:0:0:0): INQUIRY. CDB: 12 00 00 00 24 00 
(probe0:umass-sim0:0:0:0): CAM status: CCB request completed with an error
(probe0:umass-sim0:0:0:0): Retrying command
ada0 at ahcich0 bus 0 scbus0 target 0 lun 0
ada0: <KingFast P0725A> ACS-2 ATA SATA 3.x device
ada0: Serial Number 02252017B0539
ada0: 600.000MB/s transfers (SATA 3.x, UDMA6, PIO 512bytes)
ada0: Command Queueing enabled
ada0: 15272MB (31277232 512 byte sectors)
da0 at umass-sim0 bus 0 scbus2 target 0 lun 0
da0: <Kingston DataTravelerMini PMAP> Removable Direct Access SCSI device
da0: Serial Number 5B7109000242
da0: 40.000MB/s transfers
da0: 954MB (1955328 512 byte sectors)
da0: quirks=0x2<NO_6_BYTE>
SMP: AP CPU #3 Launched!
SMP: AP CPU #1 Launched!
SMP: AP CPU #2 Launched!
Timecounter "TSC" frequency 998168339 Hz quality 1000
Trying to mount root from ufs:/dev/ufs/OPNsense_Install [ro,noatime]...
Mounting filesystems...
tunefs: soft updates set
tunefs: file system reloaded
camcontrol: ATA ATAPI_IDENTIFY via pass_16 failed
** /dev/ufs/OPNsense_Install
FILE SYSTEM CLEAN; SKIPPING CHECKS
clean, 55557 free (245 frags, 6914 blocks, 0.0% fragmentation)
** /dev/ufs/OPNsense_Install
FILE SYSTEM CLEAN; SKIPPING CHECKS
clean, 55557 free (245 frags, 6914 blocks, 0.0% fragmentation)
Bootstrapping config.xml...done.
Bootstrapping openssl.cnf...done.
Configuring crash dump device: /dev/null
.ELF ldconfig path: /lib /usr/lib /usr/lib/compat /usr/local/lib /usr/local/lib/heimdal /usr/local/lib/ipsec /usr/local/lib/perl5/5.24/mach/CORE
32-bit compatibility ldconfig path:
done.
Starting configd.
Launching the init system...done.
Initializing..............done.
Configuring loopback interface...done.
Press any key to start the early installer: 1
Loading configuration...done.
Starting device manager...done.
Configuring login behaviour...done.

Default interfaces not found -- Running interface assignment option.

Press any key to start the manual interface assignment: 1

Valid interfaces are:
igb0             00:0d:b9:45:38:6c Intel(R) PRO/1000 Network Connection, Version - 2.5.3-k
igb1             00:0d:b9:45:38:6d Intel(R) PRO/1000 Network Connection, Version - 2.5.3-k
igb2             00:0d:b9:45:38:6e Intel(R) PRO/1000 Network Connection, Version - 2.5.3-k
                  

You now have the opportunity to configure VLANs.  If you don't require VLANs
for initial connectivity, say no here and use the GUI to configure VLANs later.

Do you want to set up VLANs now [y|n]? n

If you do not know the names of your interfaces, you may choose to use
auto-detection. In that case, disconnect all interfaces now before
hitting 'a' to initiate auto detection.

Enter the WAN interface name or 'a' for auto-detection: igb1

Enter the LAN interface name or 'a' for auto-detection
NOTE: this enables full Firewalling/NAT mode.
(or nothing if finished): igb0

Enter the Optional 1 interface name or 'a' for auto-detection
(or nothing if finished): 

The interfaces will be assigned as follows:

WAN  -> igb1
LAN  -> igb0

Do you want to proceed [y|n]? y

Writing configuration...done.
Configuring kernel modules...done.
Setting up extended sysctls...done.
Setting timezone...done.
Writing firmware setting...done.
Setting hostname: OPNsense.localdomain
Generating /etc/hosts...done.
Starting syslog...done.
Configuring loopback interface...done.
Creating wireless clone interfaces...done.
Configuring LAGG interfaces...done.
Configuring VLAN interfaces...done.
Configuring QinQ interfaces...done.
Configuring WAN interface...done.
Configuring LAN interface...done.
Generating /etc/resolv.conf...done.
Configuring firewall......done.
Setting up gateway monitors...done.
Starting web GUI...done.
Configuring CRON...done.
Setting up routes...done.
Starting DNS Forwarder...done.
Starting DHCP service...done.
Generating /etc/hosts...done.
Configuring firewall......done.
Starting NTP service...deferred.
Generating RRD graphs...done.
Starting syslog...done.

Welcome!  Both `root' and `installer' users are availabe for system
setup or invoking the installer, respectively.  The predefined root
password works for both accounts.  Remote login via SSH is possible.

Starting CRON...done.

*** OPNsense.localdomain: OPNsense 17.1 (amd64/OpenSSL) ***

 LAN (igb0)      -> v4: 192.168.1.1/24
 WAN (igb1)      -> 

FreeBSD/amd64 (OPNsense.localdomain) (ttyu0)

A telepítés elindításához jelentkezzünk be “installer” felhasználóval. A jelszó: opnsense

login: installer
Password:

F10=Refresh Display


                  ������������Ĵ OPNsense 17.1 �������������Ŀ  
                  �                                          �
                  � Welcome to the OPNsense 17.1 installer!  �
                  �                                          �
                  � Before we begin, you will be asked a     �
                  � few questions so that this installation  �
                  � environment can be set up to suit your   �
                  � needs.                                   �
                  �                                          �
                  � You will then be presented a menu of     �
                  � items from which you may select to       �       
                  � install a new system, with or without    �
                  � importing a previous configuration.      �      
                  �                                          �
                  �         < Ok, let's go. >                �
		  ��������������������������������������������


                   ����������Ĵ Configure Console ����������ÿ
                   �                                       �
                   � Your selected environment uses the    �
                   � following console settings, shown in  �
                   � parentheses. Select any that you wish �
                   � to change.                            �
                   �                                       �
                   �   < Accept these Settings >           �
                   �   < Change Video Font (default) >     �       
                   �   < Change Screenmap (default) >      �
                   �   < Change Keymap (default) >         �
                   �����������������������������������������

                    ������������Ĵ Select Task �������������ÿ
                    �                                      �
                    � Choose one of the following tasks to �
                    � perform.                             �
                    �                                      �
                    �   < Guided installation >            �
                    �   < Manual installation >            �
                    �   < Import configuration >           �
                    �   < Setup GEOM mirror >              �
                    �   < Reboot >                         �
                    �   < Exit >                           �
                    ����������������������������������������

      �������������������������  Select a Disk ��������������������������ÿ@
      �                                                                   �                                                                  
      � This will automatically install OPNsense without asking any       �      
      � questions.                                                        �                                                       
      �                                                                   �                                                                  
      � WARNING: All contents of the selected hard disk will be           �          
      � erased! This action is irreversible. Do you really want to        �       
      � continue?                                                         �                                                        
      �                                                                   �
      � Select a disk to continue.                                        �                                       
      �                                                                   �                                                                  
      � < ada0: 600.000MB/s transfers (SATA 3.x, UDMA6, PIO 512bytes) >   �
      � < da0: <Kingston DataTravelerMini PMAP> Removable Direct Ac... >  �
      � < Return to Select Task >                                         �                                        
      ��������������������������������������������������������������������


                   ���������Ĵ Select install mode ����������ÿ 
                   �                                        �
                   � Select the installation mode: GPT/UEFI �
                   � is the recommended option. MBR is      �
                   � provided for compatibilty with older   �
                   � hardware.                              �
                   �                                        �
                   � < GPT/UEFI mode >                      �
                   � < MBR mode >                           �
                   � < Return to Select Disk >              �
                   ������������������������������������������


         ��������������������������������������������������������������
         �                                                            �
         � /usr/local/bin/cpdup -vvv -I -o /.cshrc /mnt/.cshrc        �
         �                                                            �
         �          [\                  8%                 ]          �
         �                                                            �
         �                         < Cancel >                         �
         ��������������������������������������������������������������


         ��������������������������������������������������������������
         �                                                            �
         � /usr/sbin/mtree -U -e -q -f /etc/installed_filesystem.m... �
         �                                                            �
         �          [-                 57%                 ]          �
         �                                                            �
         �                         < Cancel >                         �
         ��������������������������������������������������������������


                   ����������������Ĵ Reboot ����������������ÿ
                   �                                        �
                   � This machine is about to be shut down. �
                   � After the machine has reached its      �      
                   � shutdown state, you may remove the CD  �
                   � from the CD-ROM drive tray and press   �
                   � Enter to reboot from the HDD.          �
                   �                                        �
                   � < Reboot >  < Return to Select Task >  �
                   ������������������������������������������

Ha kész a telepítés, jöhet a reboot:

The installation finished successfully.

After reboot, open a web browser and navigate to
https://192.168.1.1 (or the LAN IP address).

You might need to acknowledge the HTTPS certificate if 
your browser reports it as untrusted.  This is normal
as a self-signed certificate is used by default.

Rebooting in 5 seconds.  CTRL-C to abort.....

Immár a “lemezről” bootolva bejelentkezhetünk és szétnézhetünk a parancssori menüben:

login: root
Password:
----------------------------------------------
|      Hello, this is OPNsense 17.1          |         @@@@@@@@@@@@@@@
|                                            |        @@@@         @@@@
| Website:      https://opnsense.org/        |         @@@\\\   ///@@@
| Handbook:     https://docs.opnsense.org/   |       ))))))))   ((((((((
| Forums:       https://forums.opnsense.org/ |         @@@///   \\\@@@
| Lists:        https://lists.opnsense.org/  |        @@@@         @@@@
| Code:         https://github.com/opnsense  |         @@@@@@@@@@@@@@@
----------------------------------------------

  0) Logout                              7) Ping host
  1) Assign Interfaces                   8) Shell
  2) Set interface(s) IP address         9) pfTop
  3) Reset the root password            10) Filter Logs
  4) Reset to factory defaults          11) Reload all services
  5) Power off system                   12) Upgrade from console
  6) Reboot system                      13) Restore a configuration

Enter an option

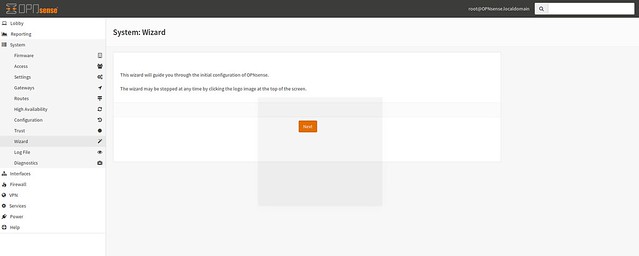
Ezen a ponton már él a webes konfigurációs felület is:

OPNsense teszt
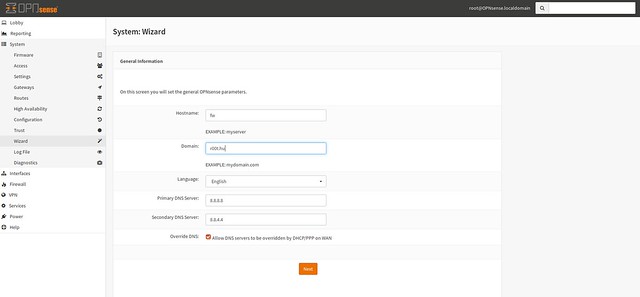
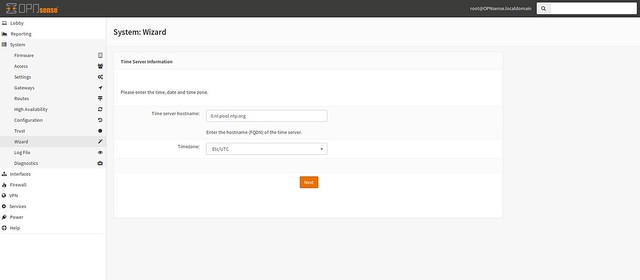
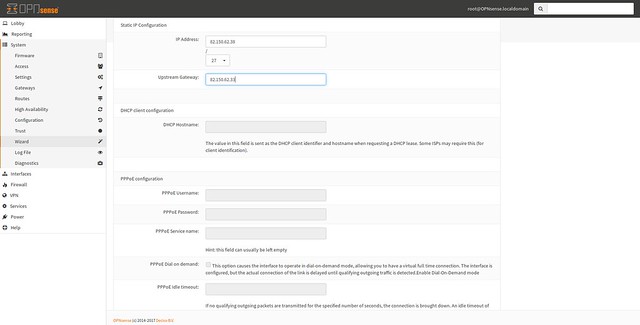
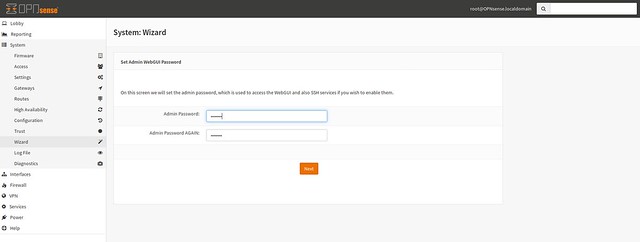
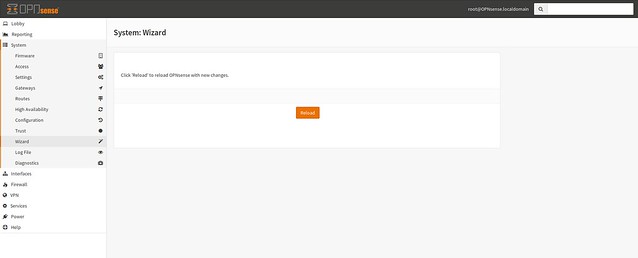
Bejelentkezés után indul a “varázsló”

OPNsense teszt

OPNsense teszt

OPNsense teszt

OPNsense teszt

OPNsense teszt

OPNsense teszt

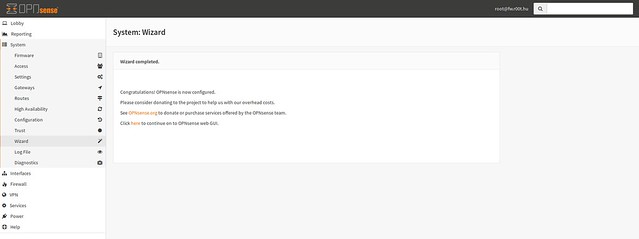
A telepítés és az alapbeállítás elkészült.

Az OPNsense a teszt alatt gyakorlatilag ugyanazt nyújtotta, amit a pfSense, annyi különbséggel, hogy egy újabbnak ható, modernebb webes felületet kínált. Sajnos azonban az új felületen több bugba is belefutottam. Felmerült bennem a kérdés, hogy miért válasszam az OPNsense-t a pfSense helyett? A kérdésre válaszokat keresve arra jutottam, hogy nincs semmi okom arra, hogy a régi, jól bevált pfSense-t lecseréljem az újabb, ám ismeretlen OPNsense-re…

Bővebben OPNsense teszt

Negyed millió dollár támogatást adott az Intel a The FreeBSD Foundation-nek

Közzétéve Szerző HUP

A FreeBSD projekt mögött álló The FreeBSD Foundation bejelentette, hogy az Intel uránium-szintű támogatójává vált azzal, hogy negyed millió dollárnyi támogatást adományozott. Az Intel és az alapítvány szorosabbra fűzi együttműködését és ennek célja, hogy az Intel termékei még jobban támogassák a FreeBSD-t. További részletek itt.

(A linkért köszönet uzsolt olvasónknak)

Bővebben Negyed millió dollár támogatást adott az Intel a The FreeBSD Foundation-nek

A FreeBSD és az OpenBSD átfogó és elfogult összehasolítása …

Közzétéve Szerző HUP

… avagy avagy az én BSD-m kevésbé vacak mint tiéd. Ezt a címet kapta az OpenBSD-s Antoine Jacoutot (ajacoutot@OpenBSD.org) és a FreeBSD-s Baptiste Daroussin (bapt@FreeBSD.org) közös előadása, amelyet a FOSDEM 2017 rendezvényen tartottak. Az előadás átirata PDF formátumban megtalálható itt.

Bővebben A FreeBSD és az OpenBSD átfogó és elfogult összehasolítása …

BSD Now 184. epizód – Tokyo Dreaming

Közzétéve Szerző HUP

A BSD Now egy heti rendszerességgel megjelenő video podcast, amelynek célja a BSD operációs rendszerek népszerűsítése, illetve a már meglevő felhasználók friss BSD-s információkkal, hírekkel való ellátása. A BSD Now egyik műsorvezetője a PC-BSD alapító, vezető fejlesztő Kris Moore. Elérhető a BSD Now 184. epizódja, címe “BSD Now 184. epizód – Tokyo Dreaming“.

Bővebben BSD Now 184. epizód – Tokyo Dreaming